Preventive dental care is important throughout your life, no matter your age. By practicing good oral hygiene at home and scheduling regular checkups with Dr. Kim, you can help keep your smile bright and healthy for many years to come.
Here are a few simple ways you can prevent the build-up of plaque and cavities:
- Brush your teeth at least twice a day with a soft-bristled toothbrush. Use fluoride toothpaste to remove food particles and plaque from the tooth surfaces. Also be sure to brush the top surface of your tongue; this will remove any extra plaque-causing food particles, and help keep your breath fresh!
- Clean between your teeth by flossing at least once a day. You can also use a mouthwash to help kill bacteria and freshen your breath. Decay-causing bacteria can linger between teeth where toothbrush bristles can't reach. Floss and mouthwash will help remove plaque and food particles from between the teeth and under the gum line.
- Eat a balanced diet, and try to avoid extra-sugary treats. Nutritious foods such as raw vegetables, plain yogurt, cheese, or fruit can help keep your smile healthy.
- Remember to schedule regular checkups with your dentist every six months for a professional teeth cleaning.
- Ask your dentist about dental sealants, protective plastic coatings that can be applied to the chewing surfaces of the back teeth where decay often starts.
- If you play sports, be sure to ask your dentist about special mouthguards designed to protect your smile.
Your child brushes her teeth twice a day, flosses regularly and visits the dentist every six months, but did you know that rinsing with fluoride – a mineral that helps prevent cavities and tooth decay – also helps keep her teeth healthy and strong?
Fluoride is effective in preventing cavities and tooth decay by coating teeth and preventing plaque from building-up and hardening on the tooth’s surface.
Fluoride comes in two varieties, systemic and topical:
- Systemic fluoride is ingested, usually through a public water supply. While teeth are forming under the gums, the fluoride strengthens tooth enamel, making it stronger and more resistant to cavities.
- Fluoride can also be applied topically to help prevent caries (cavities) on teeth present in the mouth. It is delivered through toothpaste, mouthwash, and professional fluoride applications. Professional application of topical fluoride foam and varnishes are also a valuable tool in cavity prevention.
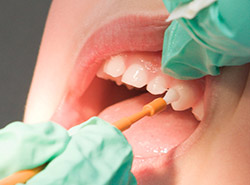
Receiving a fluoride treatment from your dentist
A fluoride treatment in the dentist’s office takes just a few minutes. After the treatment, patients may be asked not to rinse, eat, or drink for at least 30 minutes in order to allow the teeth to absorb the fluoride. Depending on your child’s oral health or your doctor’s recommendation, your child may be required to have a fluoride treatment every three, six, or 12 months. The doctor may also prescribe an at-home fluoride product such as mouthwash, gels, or antibacterial rinses.
How to choose the right fluoride treatment
When choosing your own at-home fluoride product (such as toothpaste or mouthwash), always check for the Canadian Dental Association’s (CDA) seal of acceptance. Products marked with the CDA seal of approval have been carefully examined by the CDA, and approved, based on safety and effectiveness. Take care of your child’s teeth so they can smile bright with dental fluoride treatments!
If it's been six months since your last dental checkup, then it's time to contact our practice and schedule your next appointment!
- Brushing Instructions
-
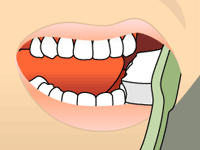
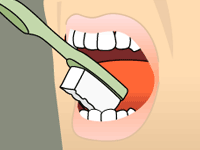
Brushing: Step 1
Place your toothbrush at a 45-degree angle to your gum.
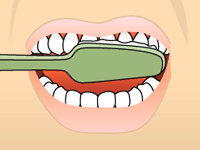
Brushing: Step 2
Brush gently in a circular motion.
Brushing: Step 3
Brush the outer, inner, and chewing surfaces of each tooth.
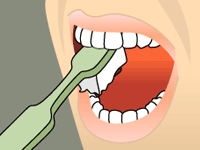
Brushing: Step 4
Use the tip of your brush for the inner surface of your front teeth.
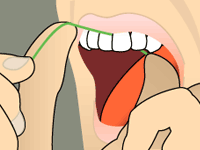
- Flossing Instructions
-
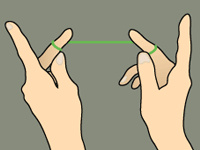
Flossing: Step 1
Wind about 18 inches of floss around your fingers as shown. Most of it should be wrapped around one finger, and the other finger takes it up as the floss is used.
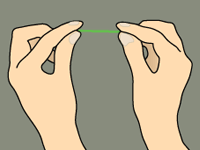
Flossing: Step 2
Use your thumbs and forefingers to guide about one inch of floss between your teeth.
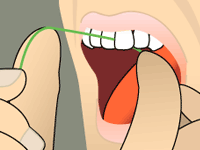
Flossing: Step 3
Holding the floss tightly, gently saw it between your teeth. Then curve the floss into a C-shape against one tooth and gently slide it beneath your gums.
Flossing: Step 4
Slide the floss up and down, repeating for each tooth.